Head over to AlternateTimelines to try!
I have a gripe with how history is represented in software. Everything is represented as a linear sequence! Undo-redo, the back button in a web browser, and worst of all - the backspace button.
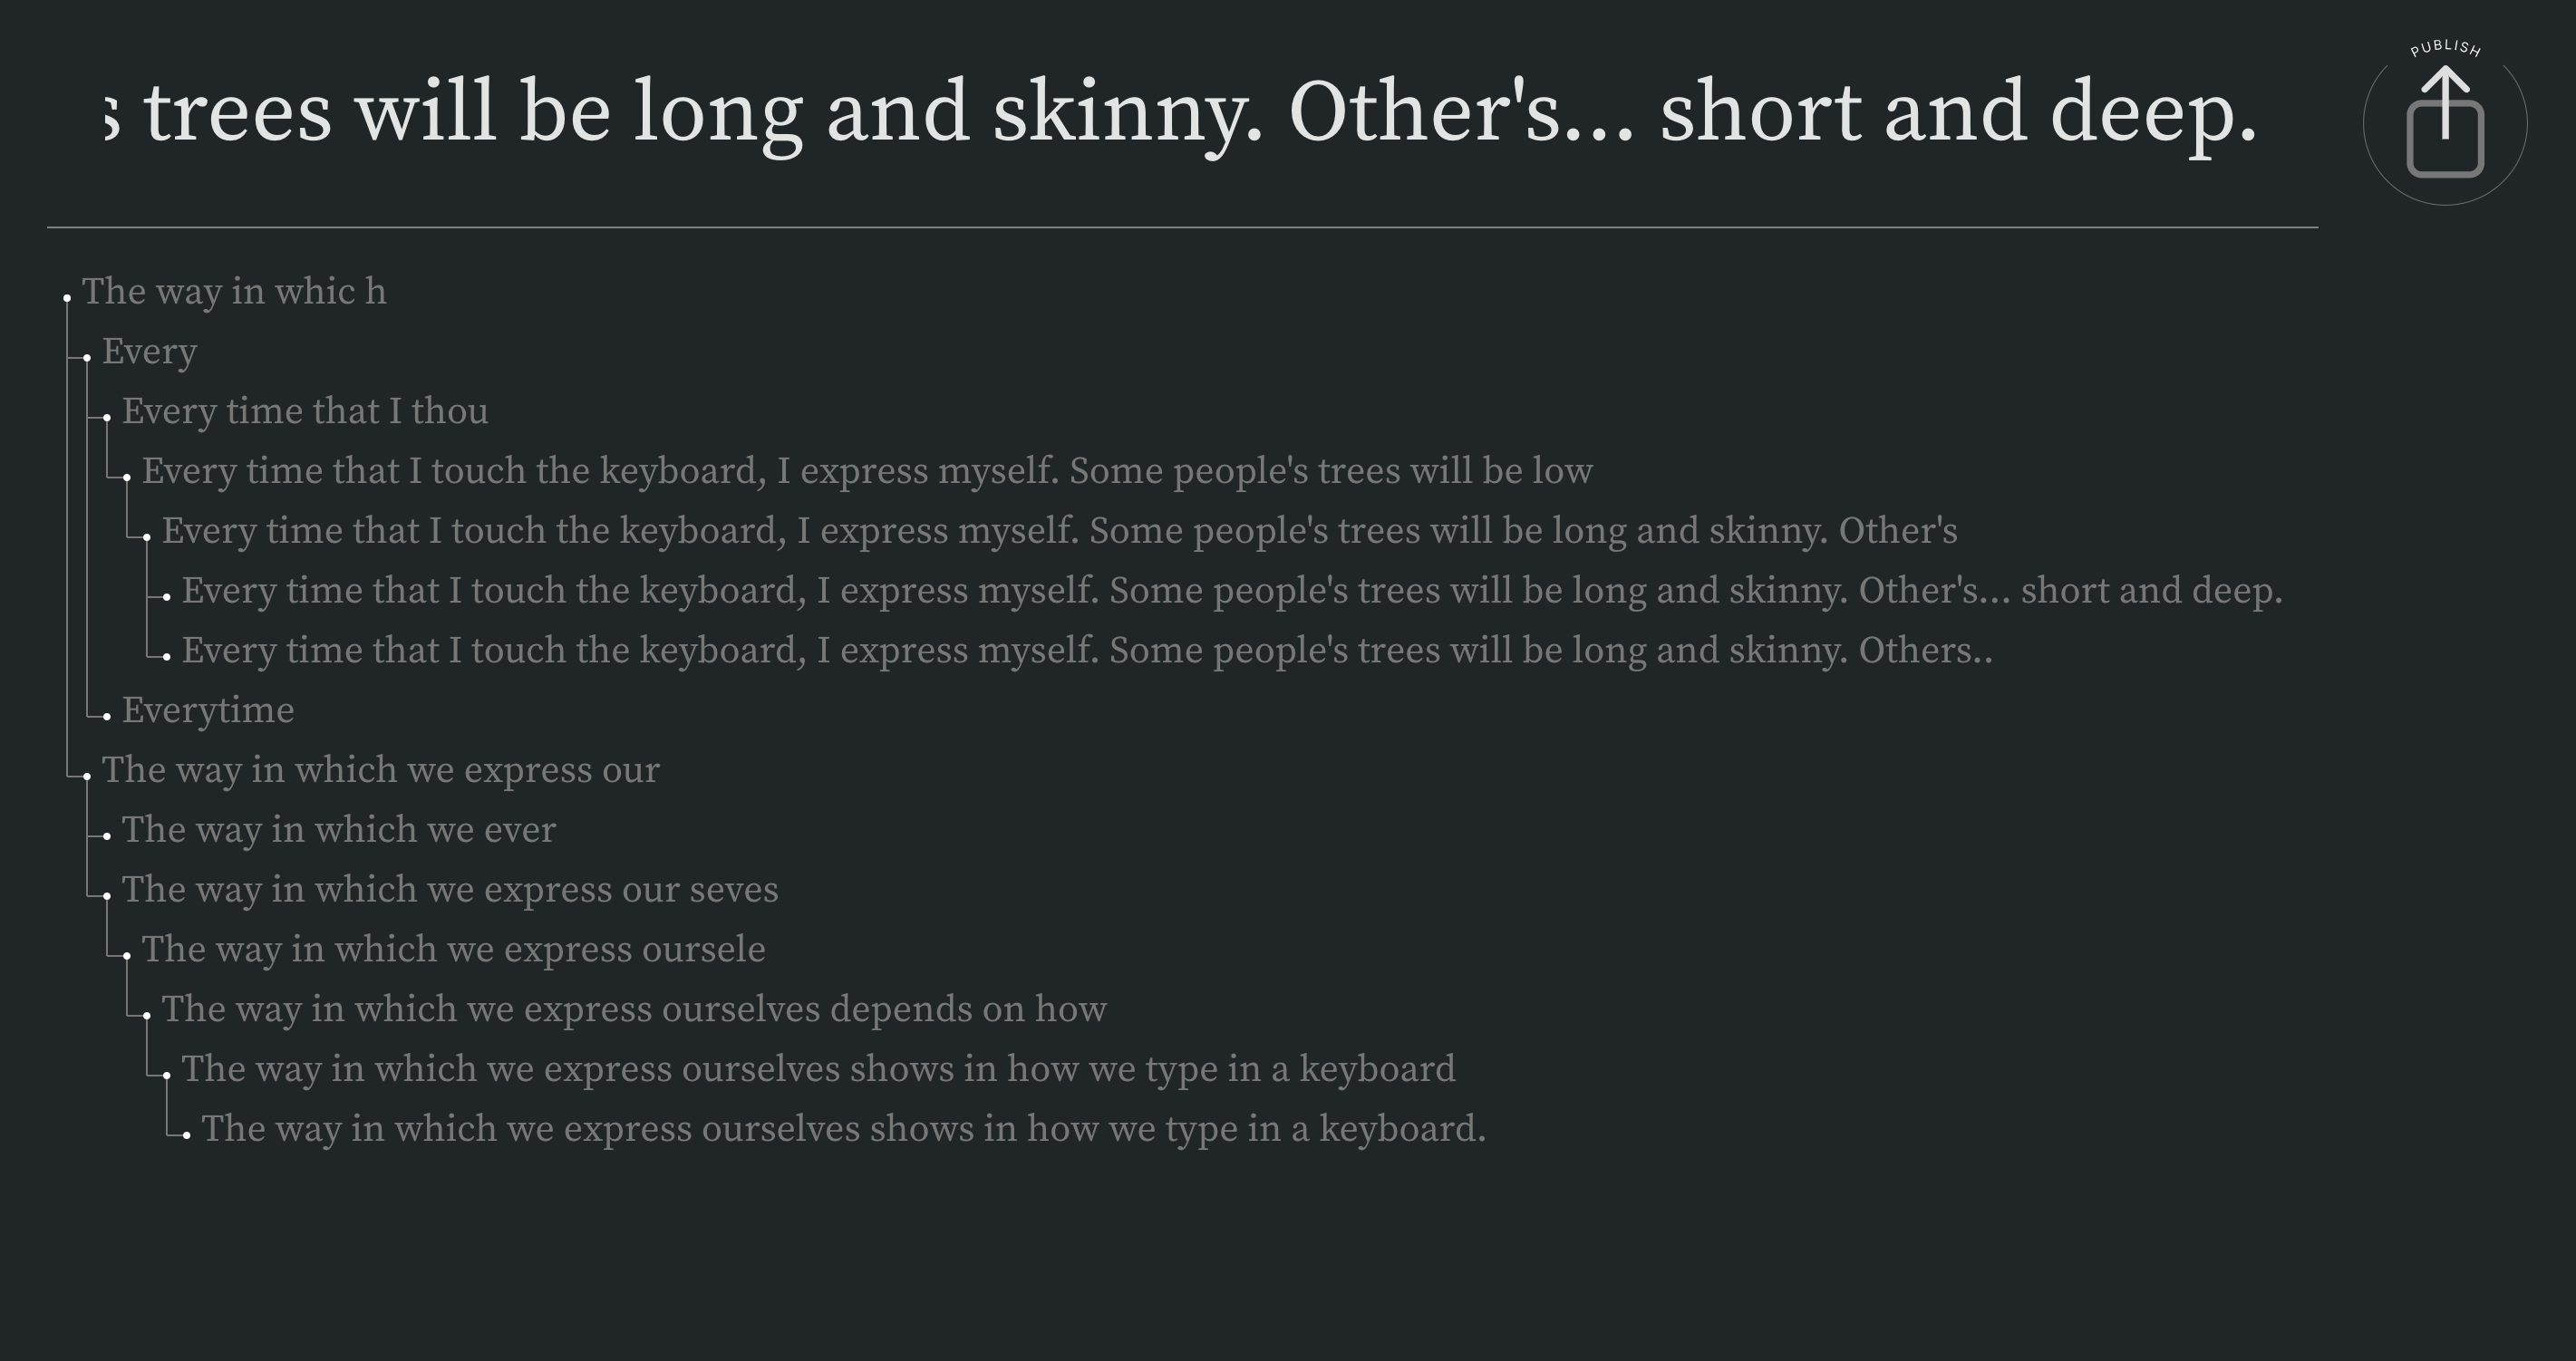
Something as mundane as typing into a keyboard is actually a unique sequence of events. Everytime you delete, you create another branch of time - ultimately leaving behind the timeline where you could have continued on with your sentence in favor of a new one.
The timelines that we create are like a fingerprint: a unique feature that we can't help but express. Like I mentioned in Rich digital experiences, I want to create an experience that implies who we are by default.
AlternateTimelines is an artistic experiment to this end: an exploration of the alternate timelines that we create everytime we tip-tap into our keyboards.
I tried at least 3 different iterations of the algorithm, of which only two are worth mentioning. The first iteration was a simple trie implementation - but that wasn't what I wanted. I didn't want the most optimized to search for a prefix, nor did I want a Trie visualization; what I actually wanted was to divide my string by time, not characters.
To be precise, any implementation of what I wanted would need to do two things:
- save the latest string when the backspace key is pressed
- create a new branch when the first legitimate key is pressed after a string of backspace keys
The second - not so much. First off, where would a new branch be created? The trie implementation didn't work because the branching logic was based on the actual text - I needed branching logic that depended on time.
The key was a kind of "manual" depth-first search. The algorithm keeps track of the user's current place in the tree via a stack that consists of UUIDs that each correspond to a node in the tree. As the user deletes, we pop nodes off the stack. When the user starts typing again, a new node is created and we push this node onto the stack. Simple, right?
Unfortunately, I didn't really know how to implement this kind of algorithm in React. React derives inspiration from the functional paradigm, so states are immutable. Fortunately, the immer library makes it super easy to treat state as if they are mutable, so it was a breeze to finish out the implementation once I found out about immer.
I wanted to actually go through a full design process with this project, so I tried my hand at Figma. The website's design was simple from the get-go, so I didn't expect to pull out any crazy Figma hacks or create anything too complicated. The final wireframe ended up looking like this:
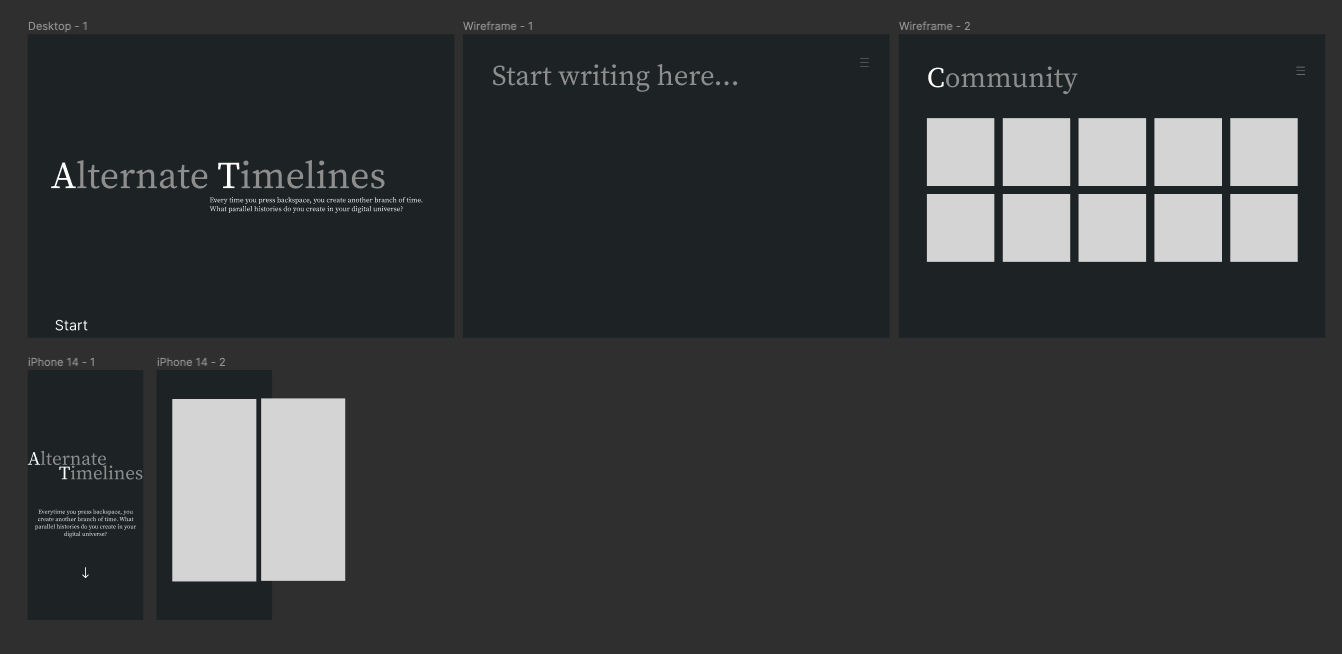
Clearly some details have changed, but the overall "feel" remains consistent.
I also designed the icons! At first, I only had a "Publish" and "Published" button, but upon using the button, I realized that there was zero feedback for when the timeline was being published. So I added a "Loading" icon, too. But shortly after, I faced my first failed publish - so I added a "Failed" icon as well.
I'll continue to use Figma for wireframing and quick design prototyping. I used to waste hours of my time tweaking fonts, font sizes, and colors in CSS, but using Figma to segregate the aesthetic workflow from the logical inner-workings has been helpful to say the least. For one, the design feedback loop with CSS is sneakily fatiguing: I tweak some CSS, switch to my web browser, refresh, and repeat. Call me stupid, but I don't know of any other way to do it without installing anything. With Figma, however, I don't need to switch contexts at all. I can focus wholly on the design itself.
I mentioned in The underbelly that I had wasted a lot of time trying to find alternatives for React-Router. This was a reference to this project. Vercel really doesn't play nice with React-Router because Next.js has its own routing logic that conflicts with React-Router. I tried out the hack of adding a vercel.json file, but to no avail. I also thought about making it multi-page application, but given how large React is, I wanted to avoid this as much as possible.
Learning in conjunction with one of my other projects Cerberus, understanding why using React with a multi-page application might be a suboptimal idea took me through a whirlwind of the current web ecosystem.
Unlike this blog, modern websites have a lot of expectations. They need to provide good interactivity out of the box.
The first instinct of a programmer is to run away from a difficult problem and abstract it away. That's the approach that React uses - it uses the virtual DOM, which abstracts away the actual DOM and its various implementations on different platforms. Svelte takes a completely different approach - it opts to move all the overhead of the vDOM from runtime to buildtime.
In broad strokes, React works by creating a virtual DOM, diffing the virtual DOM with the actual DOM, and then committing changes to the actual DOM based on the differences that were found in the previous step. All of this runs on the client's machine - at runtime. This is to say that websites that use React need to load the entire vDOM implementation, and, as we saw before, there's a fair amount of overhead in actually making a change to the real DOM.
Svelte instead generates Javascript code that will handle all the reactivity and data passing for you. It's as if an extremely productive programmer took your Figma concept and coded the entire thing in Javascript - all while using the DOM APIs like the olden days.
This project was also my first actual look at how bundlers like Webpack and Rollup work. The resource I consulted was minipack, which lays out a very simple JS bundler for education purposes.
A bundler constructs a graph through the search space of modules using breadth-first search. The programmer must provide an entry point to the bundler. An entry point is where the bundler starts constructing its dependency graph. For example, if main.js imports a module called some_module.js, then the dependency graph will look like: main.js \(\to\) some_module.js. If some_module.js imports some other module called some_other_module.js, then the dependency graph looks like main.js \(\to\) some_module.js \(\to\) some_other_module.js.
Constructing the dependency graph is a kind of "pre-work" because no code is executed; so now the bundler needs to produce "bundled" code that executes the dependency graph. minipack does this by constructing a self-invoking function that is called as soon as the module is loaded in the entry HTML file. Rollup appears to take the same approach, at least from my quick glance at the ./dist/index.js file.
A side thing I noticed: when you transpile ESM-type import statements like import message from './message.js' and message.js contains a line like export default ... the transpiler outputs something like:

Which is to say that if message.js is an ES module and it has a default export, then the "output" of message.js is contained in an object with key default.
As explained in minipack, the CommonJS module system expects a require function, a module object, and an exports object. The exports object is mutated by the module's code, and is exposed to the modules that point to it in the dependency graph.
When I first heard about bundlers, I had a misconception that bundlers somehow took all the modules and bundled them so that everything could fit into one, and only one, global scope.
What actually happens is a little less magical, but magical nonetheless. The modules on their own do not know about each other. The programmer, however, knows about the logical and semantic relationships between the modules. So all the bundler does is associate the modules with their semantic relationships by taking all the code in the separate modules, and placing them into one file. In other words, the point of a bundler is to allow the programmer to maintain clean organization of his/her files while leaving the computer to do the grunt work of combining the files together and executing them.
I'd been coding mostly in Python and Javascript/Typescript for the past few years, so I wanted to try my hand at a different language. Since I'm allegedly a programming language nerd, it wouldn't make much sense if I hadn't tried out different languages now, would it? I saw that Eric Zhang's classes.wtf used Go for its backend, so I decided to try my hand at Go.
I found a great book, Learn Go with Tests, and worked through the first couple chapters - enough to get the wheels spinning.
This wasn't my first exposure to test-driven development (I was first exposed to it during my internship at Stedi), but it was my first time doing a personal project with it. The TDD workflow is as follows:
- Design the test.
- Write enough code to pass the test.
- Refactor.
- Repeat.
Like a good TDD boy, I came up with four absolutely essential API endpoints, designed tests for them, and iteratively refined my code until all my test cases passed. This was a really awesome experience; in my personal projects, I usually do a million print statements and some eyeball-test cases - but I always feel a little anxious that there is something sneaky that I missed while changing/refactoring. Tests from the outset eliminate this anxiety because I can depend on them for rapid and precise feedback.
I plan to continue on with Learn Go with Tests - it's a fantastic book and it promises to be a great introduction to software engineering concepts and practices. Plus I get to learn Go!
I'd run into CORS issues before, but this was the first time that I gave CORS some proper attention. Before this project, I had always relied on packages and browser extensions for CORS handling. But this time, I wondered how difficult it would be to just handle CORS myself. After all, all these web frameworks (Flask, Gin-Gonic, etc.) don't offer CORS out of the box; it's either so easy of a problem that the web framework developers didn't think that it was worth their time, or so hard that they chose to offload the work to other contributors.
Only one way to find out.
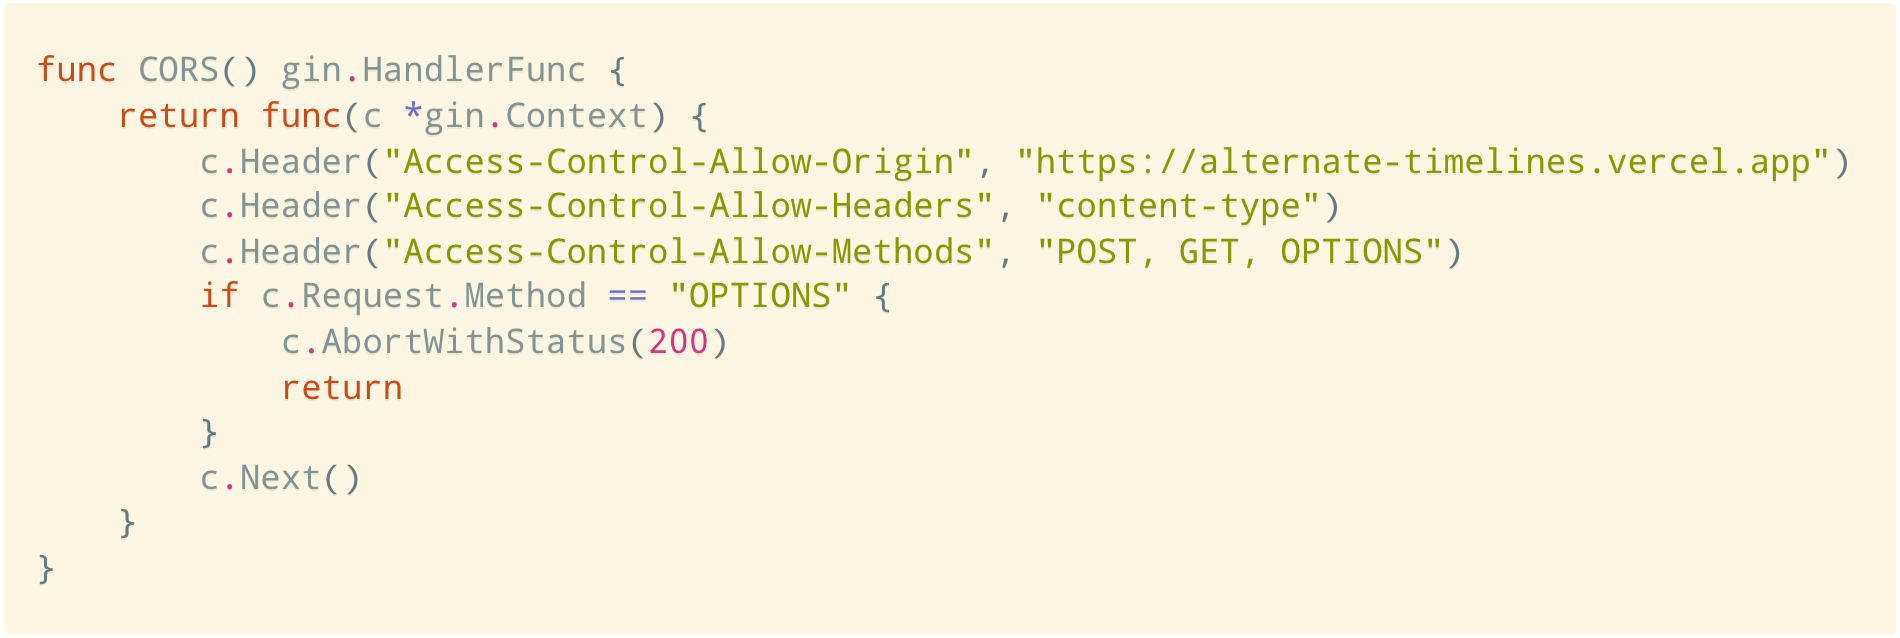
I ended up writing only 11 lines of code, but I read a lot more lines about HTTP and CORS. Here's what I learned.
CORS stands for cross-origin resource sharing, and it's a security protocol that is implemented with browsers in mind. In particular, CORS prevents attackers from reading information that they are not supposed to see. Consider the following scenario. You have two websites: avocado.com and affogato.com. The first website, avocado.com, needs some information from affogato.com, which affogato.com gladly provides. But rotten-avocado.com wants information from affogato.com, too - information that is meant only for avocado.com.
Enter CORS. When rotten-avocado.com sends a request to affogato.com, affogato.com will actually send a response back with the requested information. However, the browser will block that response from reaching rotten-avocado.com, due to the CORS protocol.
Keep in mind that CORS is not a fail-safe protocol against cross-site attacks, like cross-site request forgery (CSRF). All CORS does is prevent a malicious site from reading the server's response. But it does not prevent the malicious action itself. If your server happens to have a DELETE endpoint and a malicious site calls the DELETE endpoint, your server will actually respect the request. It's just that the site won't be able to read the subsequent response from the server (i.e. the malicious actor won't know if his actions succeeded or not).
Before getting into how CORS is implemented, let's talk about HTTP.
The HTTP protocol is a language that Internet servers and clients use to speak to each other, particularly when a client requires resources from a server - whether it be a web page, an image, or an audio file. Every conversation between the client and the server consists of (1) a request from the client and (2) a response from the server. These requests and responses generally have the same set of components:
- A start-line that describes the kind of request/response
- A set of optional HTTP headers that describe the payload
- The payload itself
Cross-origin resource sharing (CORS) concerns the optional HTTP headers. Since CORS is about preventing unwanted access to server responses, there are more diverse HTTP headers for responses than for requests. Just to list a few:
- Access-Control-Allow-Origin: which origins are allowed to read the response.
- Access-Control-Allow-Methods: which methods are allowed.
- Access-Control-Allow-Headers: which headers are allowed.
The main one is Access-Control-Allow-Origin. The other two concern preflight requests, which is the browser's way of dipping its toes in the water before making the actual request. For POST requests (and other non-simple requests), the browser will first send a preflight request containing Access-Control-Request-Method and Access-Control-Request-Headers headers. The server will respond with a preflight also, but if the response contains header information that doesn't line up with what the browser requires, then the actual request is blocked.
After learning that CORS just amounts to tacking on some HTTP headers, I quickly hacked together a middleware function that adds the required headers to the response:
So ends the children's tale of CORS.
Was this just an art project? Yes and no. While I do want to put on an exhibit for the "constellation of trees", this project was also a small exploration into how we might more naturally incorporate branching into any computationally-aided creative process (generative design, programming, exploratory data analysis, etc).
There have been multiple times when I'll be analyzing some dataset and want to try out different things that "branch out" from some checkpoint.