For the unacquainted, TLDraw is a primitive for infinite canvases (much like how ProseMirror is a primitive for text editors). I've spent the past couple days reading through the TLDraw codebase, and it's taught me loads about how an interactive React-based application is architected.
There are two coordinate systems for an infinite canvas: global space and viewport space. Global space is the "absolute" coordinate space - the coordinates that objects actually have. Viewport space is the "relative" coordinate space - the coordinates that objects have relative to the viewport. (This distinction is similar to clientX and offsetX.)
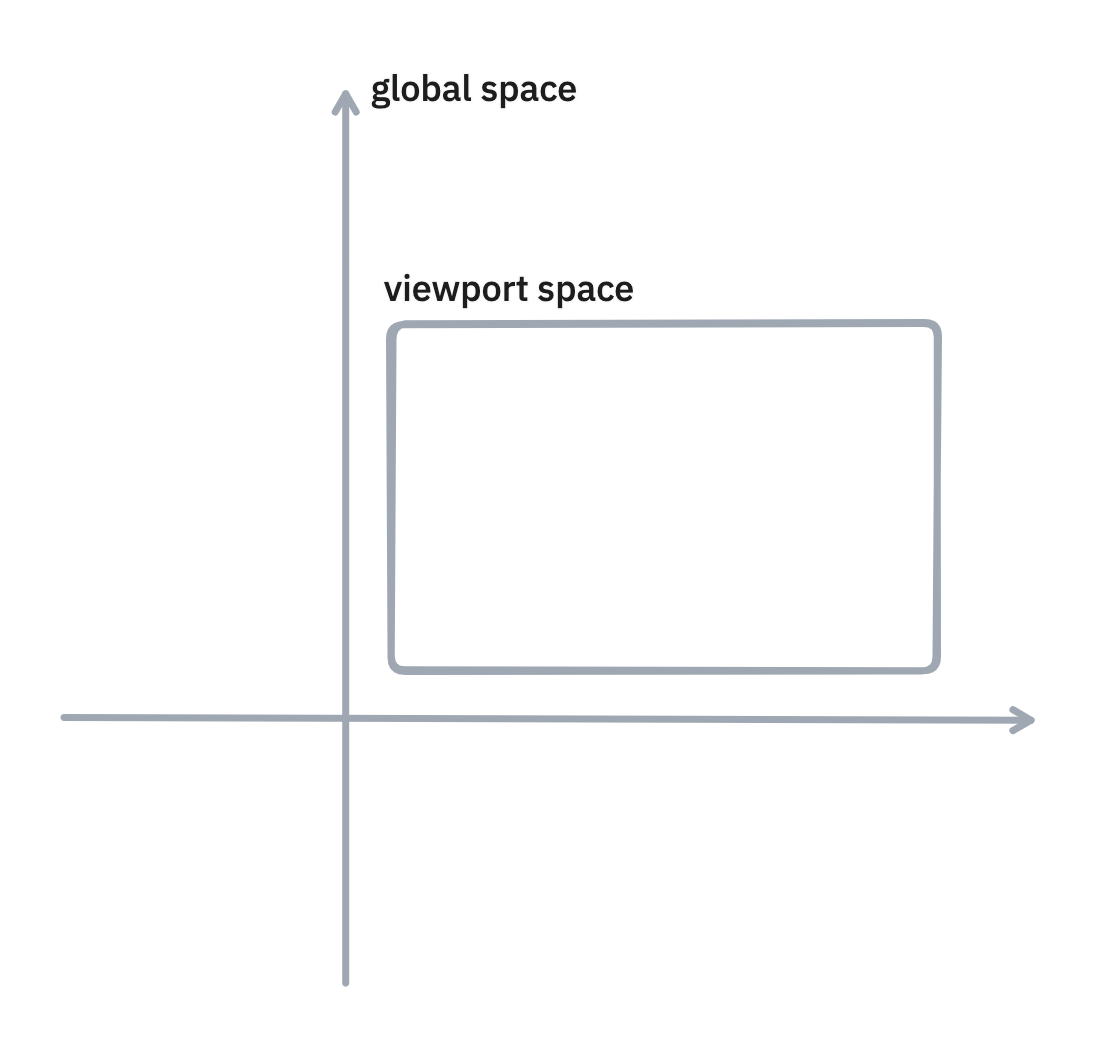
Such a distinction is necessary because all user interactions are in viewport space, and user interactions need to be converted into proportionally-accurate global space so that their interactions affect the canvas in a way that meets their expectations from working with objects in the real world. For example, when they drag the canvas 4 centimeters while zoomed out to 0.25x scale vs. 1x scale, the global space should move 4x more in the former case.
Practically, what is shown in the viewport is controlled by the camera, which informs which part of the canvas to display. It's just an x-y point (in global coordinates) and the current zoom. We'll talk about the camera more when we explore panning/zooming.
On the interaction side, we have tools. User actions affect the canvas differently depending on which tool is selected. TLDraw's tools are represented as nodes in a state tree, as the TLDraw's documentation shows:
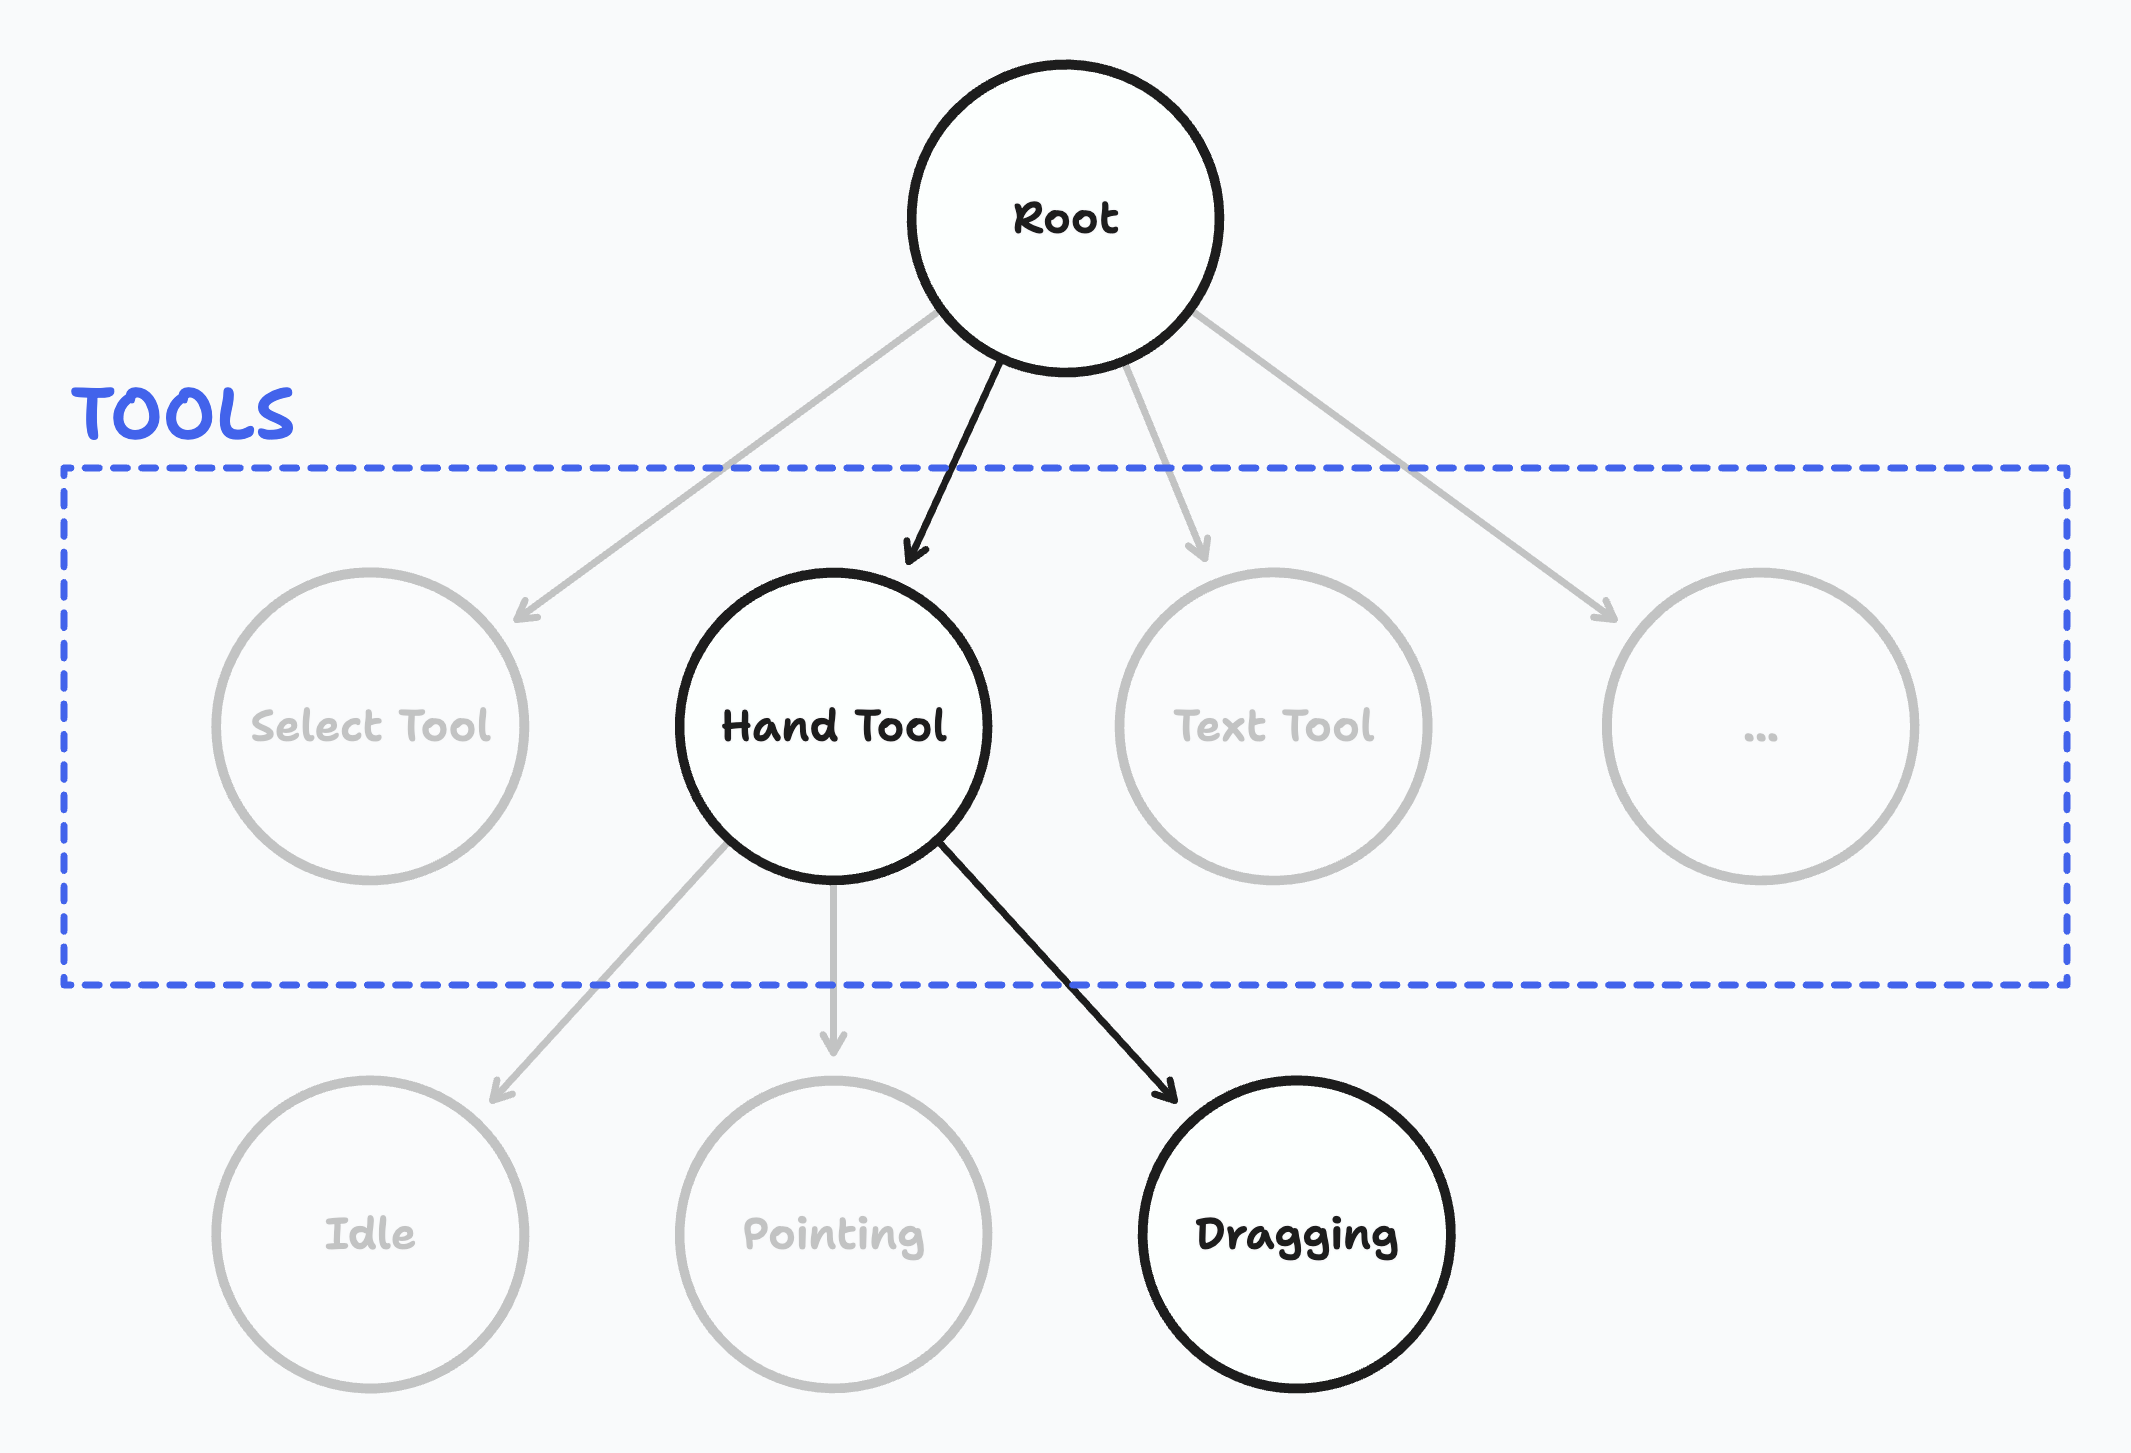
This abstraction makes thinking about user interactions very easy. Consider this series of interactions:
- Choose the hand tool.
-
Pan to another area of the canvas.
- Pointer down on the canvas.
- Pointer move.
- Pointer up.
This can be modeled as activating different nodes of the tool state tree:
![]()
When the hand tool is selected, the Idle child state is activated. Upon pressing down on the canvas, the Pointing state activates. Then, dragging the cursor toggles the Dragging state. When the pointer is released, we go back to the Idle state.
Now, let's dive deeper into the source code.
When I go through codebases, I usually center my investigation around several questions. We'll address the following questions:
- What HTML element is the TLDraw canvas based on?
- When I draw a rectangle, what happens?
- How does camera panning/zooming work?
- How does TLDraw's selection logic work?
TLDraw isn't based on the Canvas API. It uses straight-up HTML and SVGs.
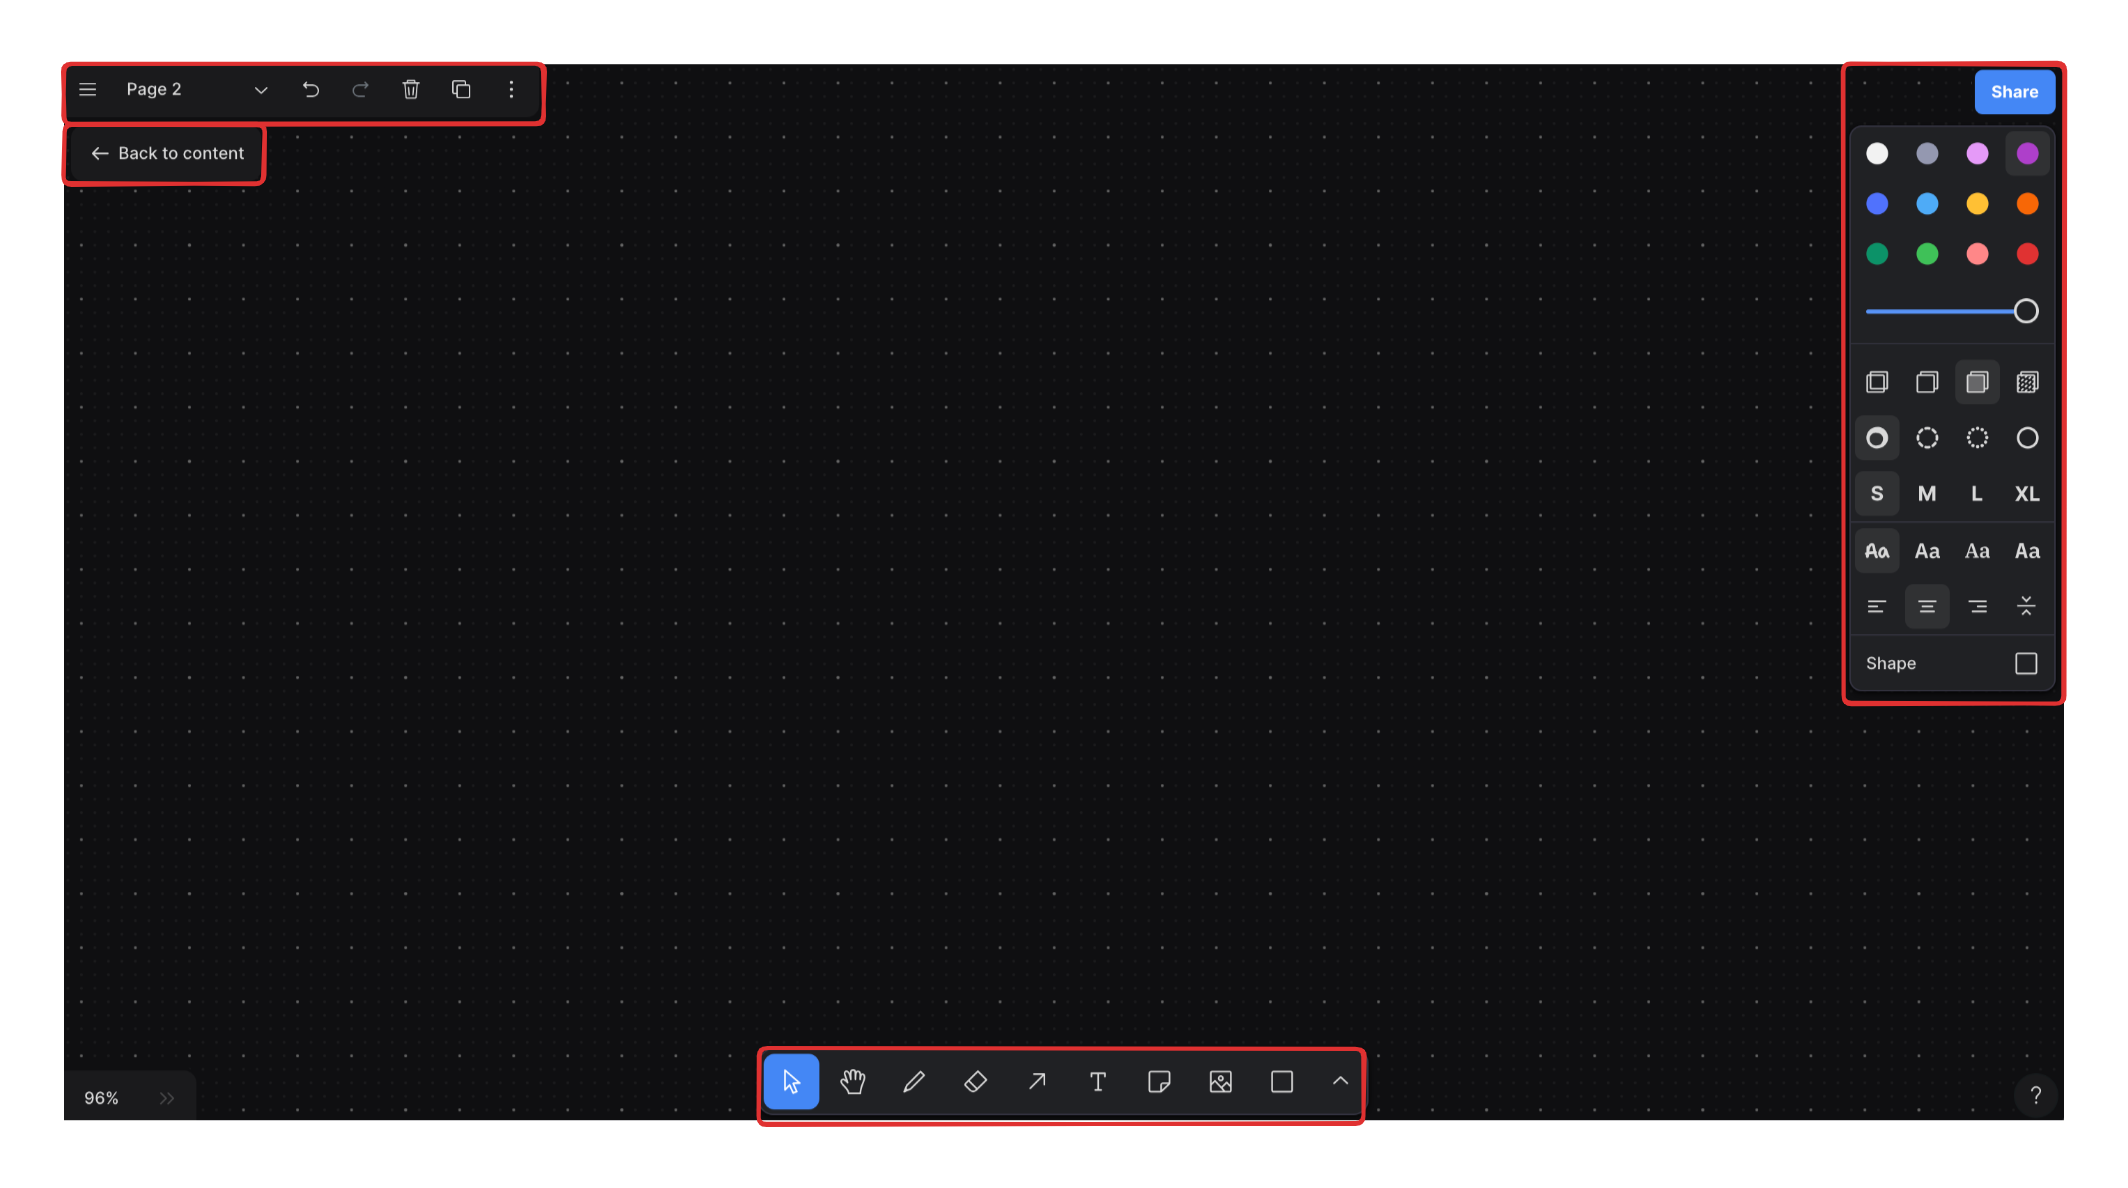
There are two layers to the TLDraw canvas. Let's call the first and second layers rHtmlLayer and rHtmlLayer2, respectively.
rHtmlLayer is for objects that are directly tied to the canvas: shapes, lines, arrows, etc. Anything embedded in rHtmlLayer should move and scale along with the canvas.
rHtmlLayer2 is more of an overlay layer that isn't directly tied to the canvas. For eaxmple, when you pan and zoom, you don't want your toolbar to also be affected - hence the toolbar lives in rHtmlLayer2. See the elements corresponding to rHtmlLayer2 in red below:
Of the two layers, I think the more interesting layer is rHtmlLayer, since that's where all the actual canvas rendering happens. Let's go through how a shape is drawn onto rHtmlLayer.
The parent component of all things shapes is ShapesToDisplay, and each shape is rendered as a Shape component. All the shape data is retrieved via getRenderingShapes(), which is a wrapper function that sorts the returned shapes from getUnorderedRenderingShapes() by ID so that React doesn't needlessly re-insert existing elements into the DOM.
Let's take a closer look at the Shape component. The comment at the top of the file contains the moneymaker hint:
If you take a look at ShapeUtil.ts, you'll see the component() method - the main rendering method - that's called in the InnerShape component:
So - we've gathered that every shape has a child instance of ShapeUtil. Let's just take a simple rectangle and see what its ShapeUtil looks like.
Every geometric shape uses the GeoShapeUtil component. Here, component() returns another component called GeoShapeBody (among other components, which we ignore for the moment). Rectangles fall under the default switch case, and navigating there brings us to the SolidStylePolygon component, which is just a light wrapper component around an SVG path!
To summarize, this is what we learned from the top-down:
- Shapes are rendered onto rHtmlLayer.
- The essence of a shape can be distilled down to the JSX element that's returned from calling .component().
- For a simple rectangle, .component() returns an SVG element.
Let's walk through what happens from a high-level:
- the rectangle drawing tool is chosen,
- the pointer is pressed into the canvas,
- the pointer is dragged, drawing the rectangle on the canvas, and finally,
- the pointer is released.
- The actual rectangle tool button is clicked.
- The currentTool is set to 'geo'. The initial state of the geo tool is idle.
- The TLDraw canvas is already hooked into interaction events with useCanvasEvents.
- The tool state tree transitions into the 'pointing' state, which is a child state under the geo tool.
- onPointerMove is called, which creates the shape.
- The active tool is switched to the resize tool, which is a child state under the select tool. Notice that onInteractionEnd is set to 'geo'.
- The rectangle, which is the only selected shape at this time, is resized.
- Because onInteractionEnd was set to 'geo', control returns to the 'geo' tool on onPointerUp.
- The bounds and dimensions of the shape are updated.
- Control is given back to the select tool, or remains with the geo tool - depending on if tool lock is toggled.
How the camera actually displays different portions of the canvas can be found in the DefaultCanvas component:
![]()
Here, x y z refer to the camera position. The canvas listens to updates to the camera values, and subsequently applies scale and translate to the inner canvas element.
Panning is pretty easy. Your pointerDown and pointerUp positions form a vector, and TLDraw applies this vector to the canvas via CSS translate. If instead you're panning using a trackpad, this displacement vector is taken directly from wheelEvent.deltaX and wheelEvent.deltaY, and scaled according to the current zoom level.
Zooming is slightly more involved. If you've zoomed around on TLDraw, you might've noticed that you zoom towards your pointer position; your pointer becomes the new "origin" of the global space. This means that zooming isn't a simple application of scale() - you need to simultaneously pan the canvas such that your pointer remains the only fixed point on the canvas.
That's the key observation: when you scale, you should scale everything such that your pointer position remains invariant.
To do this, compute the global positions of the cursor under the current scale and the next scale also.
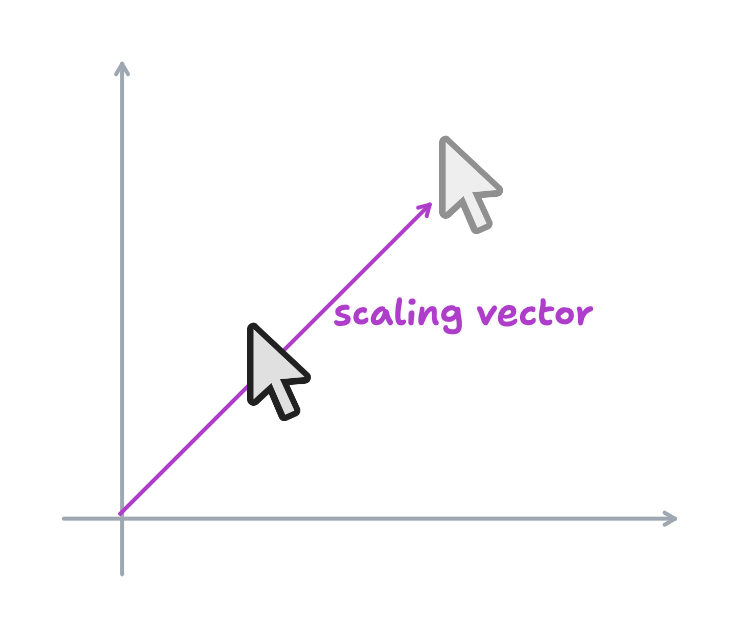
Take that difference vector, reverse the direction, and apply it to every point on your canvas. This way, the pointer remains invariant during zooming, and the other elements scale around it.
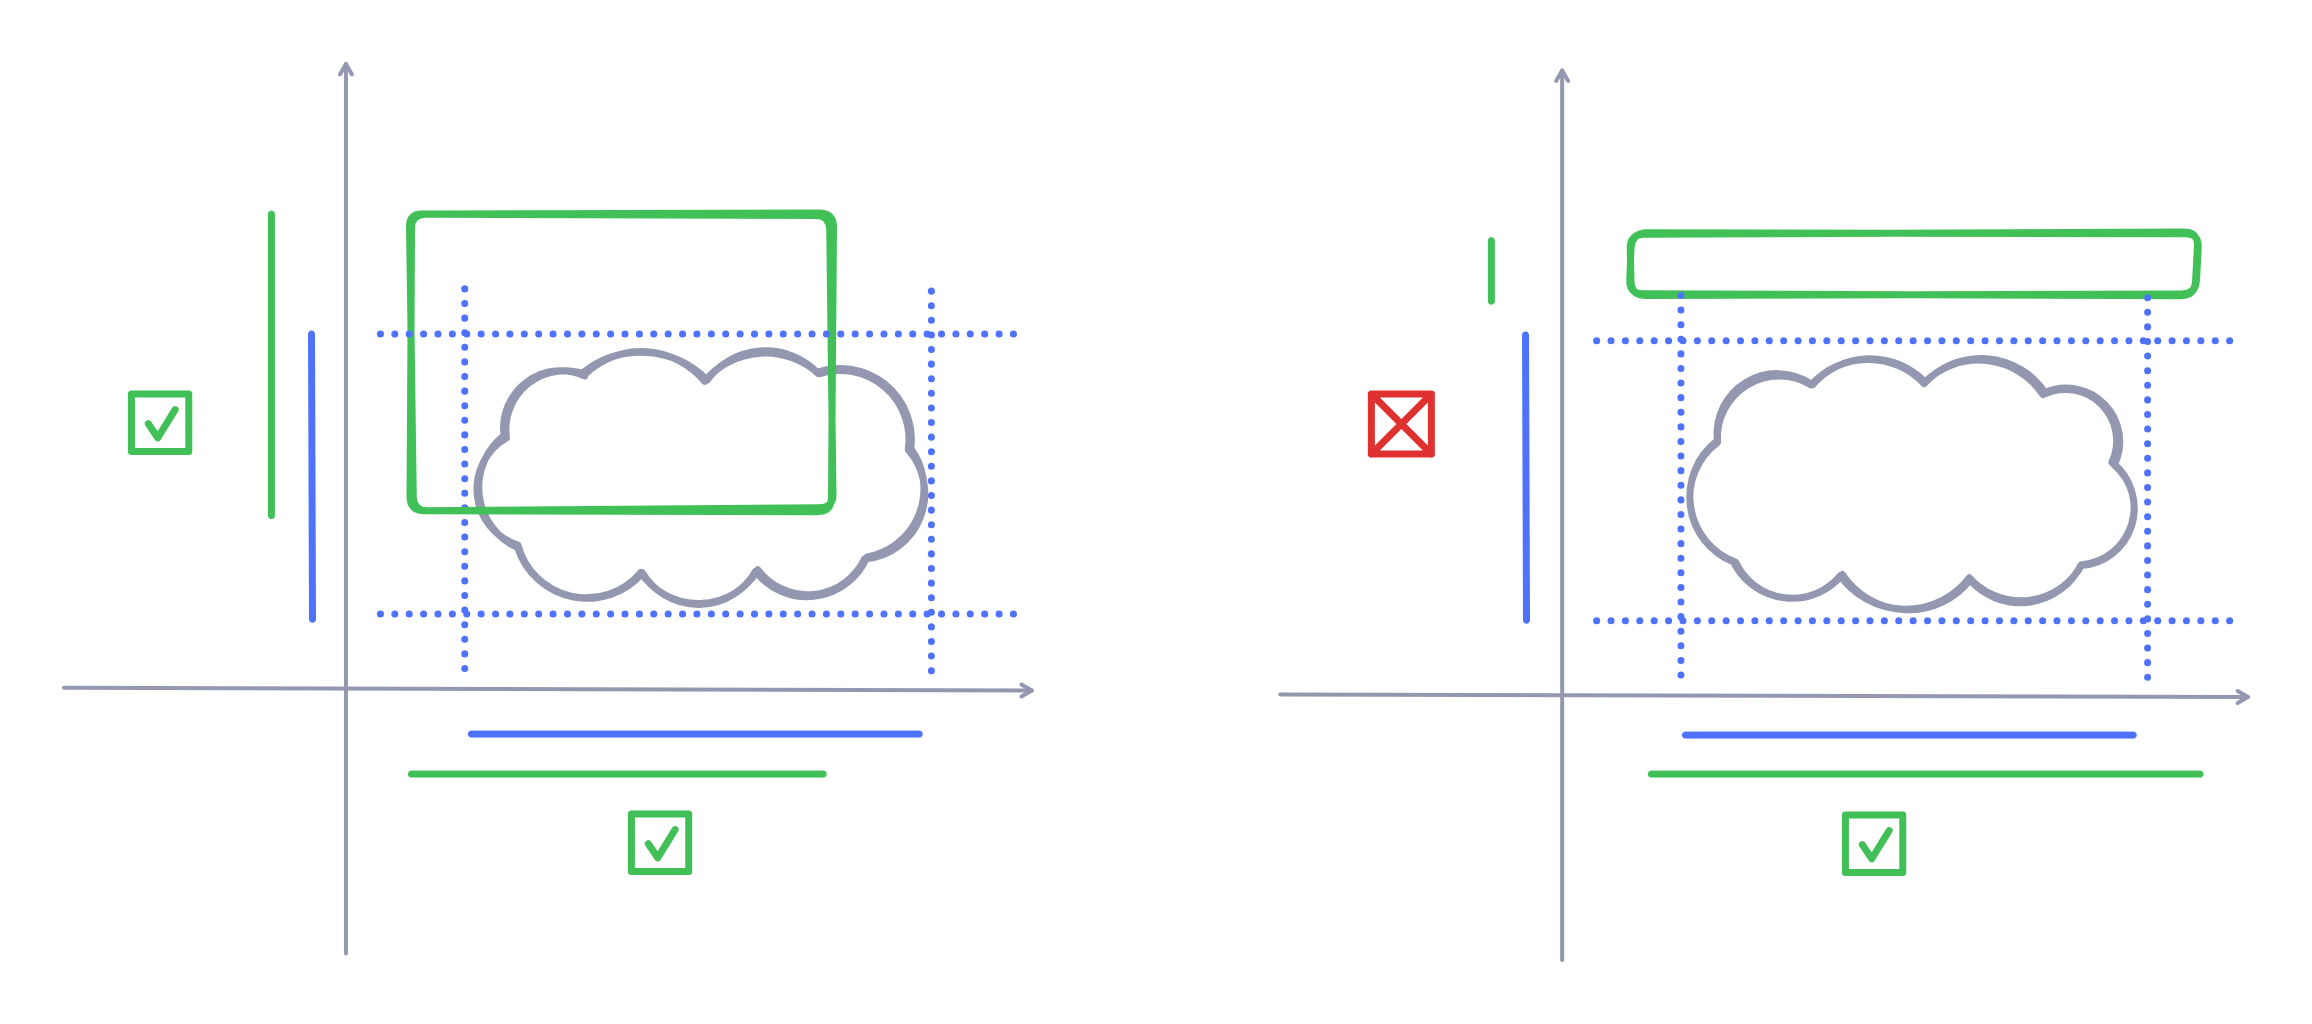
Selection logic is all about answering "what does it mean for an object to intersect with a rectangle?".
TLDraw has two different "modes" for selection: wrapping mode and non-wrapping mode. Wrapping mode requires that you contain the entire desired shape in your selection box; the latter requires just collision with the selection box.
Algorithmically, what does it mean for a box to "contain" or "collide" with an object? First off, every object has a rectangular bounding box.
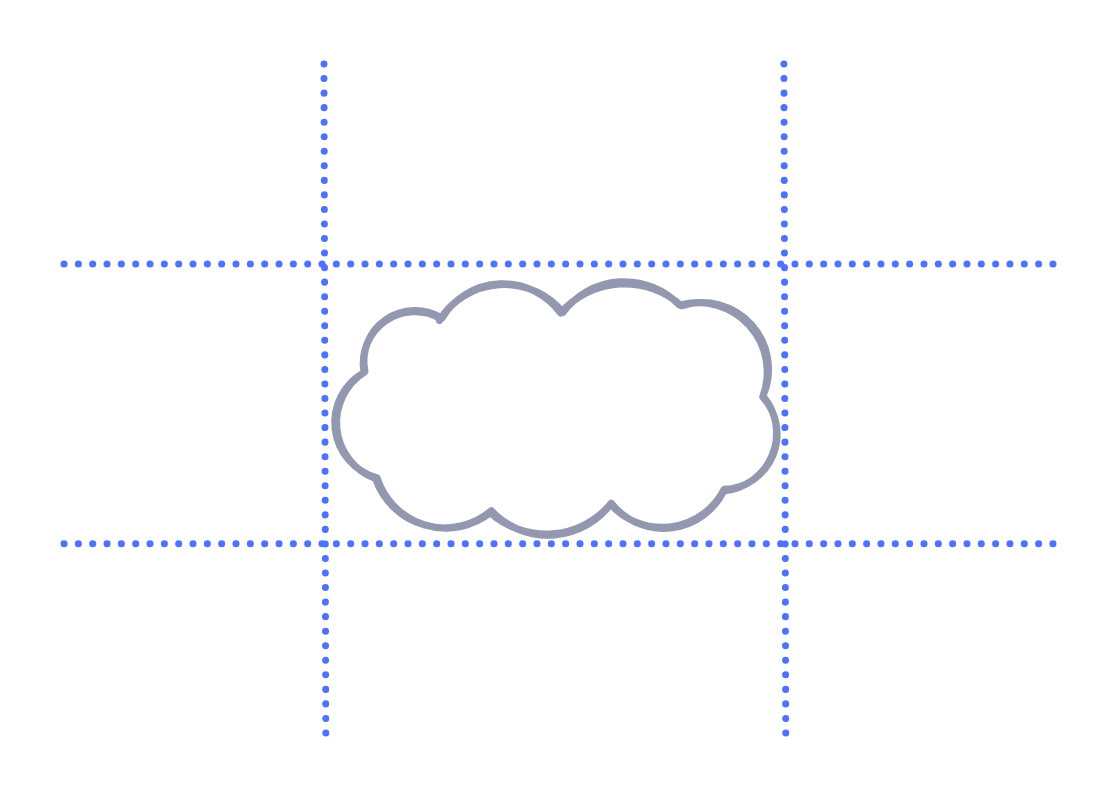
In order to contain a shape, the x and y projections of the selection box need to wholly contain the x and y projections of the bounding box. In code, this means that the selection box's minimum and maximum x-axis points need to be wider than the bounding box's minimum and maximum x-axis points, and likewise for the y-axis.
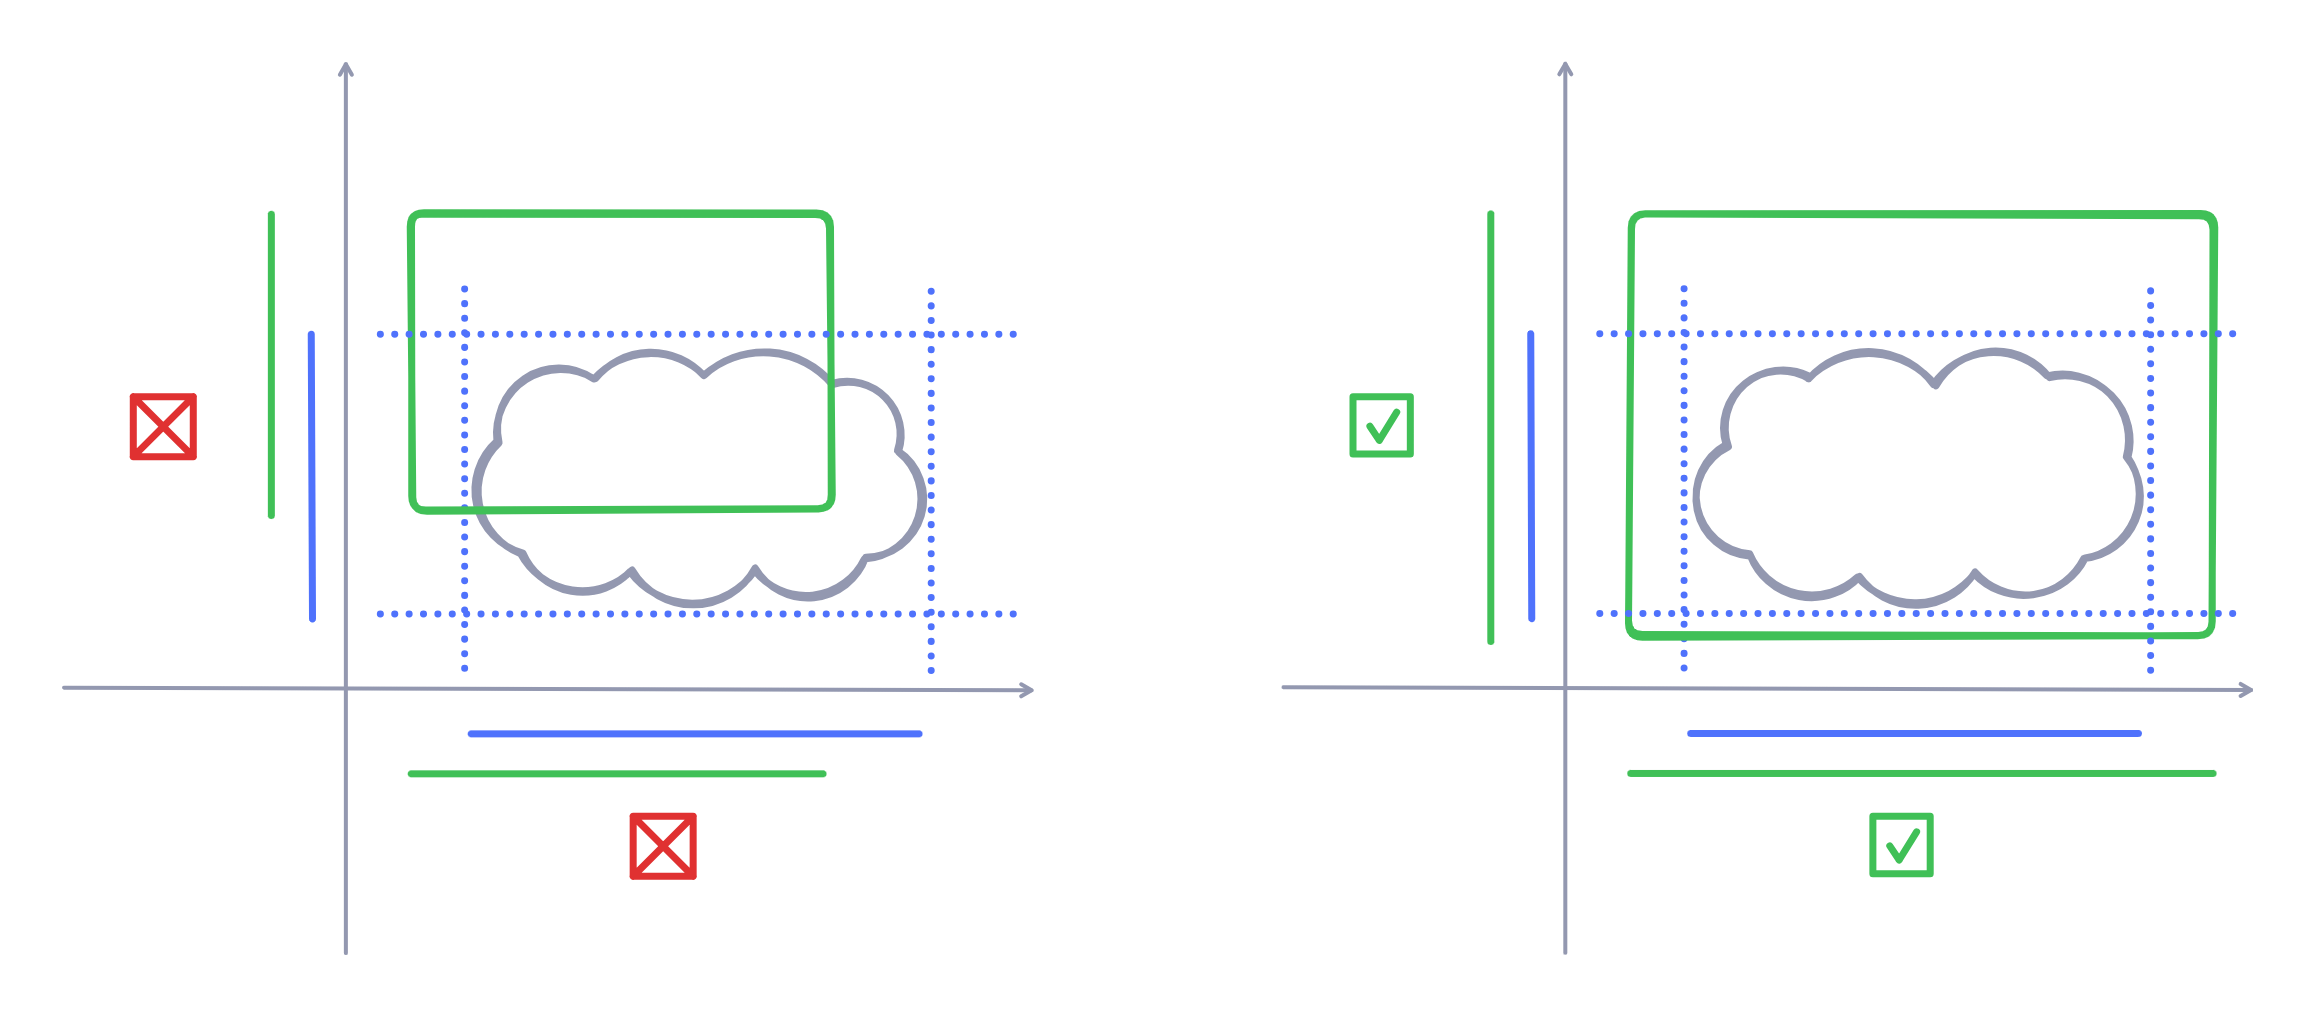
In order to collide with a shape, the selection box's x and y projections need to intersect with the bounding box's x and y projections. In code, this narrows down to two simple interval overlap tests on the two axes.
That concludes my short tour through TLDraw. Infinite canvases have been making some big splashes as of late, as LLMs are inviting people to experiment more with unconventional interfaces for conventional problems. TLDraw's make-it-real demo was particularly eye-opening; it broke out of the typical "text-editor" interface that you see from LLM applications, and gave a glimpse of how infinite canvases can be used as a different form of computational interface.
Of course, this write-up wouldn't have been possible without TLDraw being open source. TLDraw's creator Steve Ruiz's older blog posts were also an amazing resource. Make sure to check out the references for more information!
- Steve Ruiz's older blog posts
- TLDraw's source code, obviously
I could not get zooming to work the first time around. I couldn't find anything glaringly wrong, and it looked like everything was correct.
I later realized that I was using clientX and clientY for a canvas that wasn't the size of the entire viewport - so my viewport coordinates were incorrect! I changed my canvas to take up 100% of the viewport, and all was well with the world.
Another solution I could've used was offsetX/Y, but I had planned to make the canvas viewport-sized anyhow.
While making baby-tldraw, I struggled with seeing how TLDraw's Editor object could trigger reactive behavior. In Editor.ts, you can see that Editor object has methods for mutating itself, which is a React no-no. But clearly, there's some reactive behavior going on.
A first look shows that the TLDrawEditor component instantiates a new Editor instance with the useState hook (reference). This instance is passed into the EditorContext.Provider to be used in the EditorContext (reference).
The child component of TLDrawEditor is a component called InsideOfEditorAndUiContext. This component uses the useEditor hook, which supplies the Editor instance that was fed to the context-provider earlier.
But still, how does reactivity occur?
While drafting out this post, I was able to get on a call with Steve, and he graciously directed me to the Signia library. It's the state management solution powering TLDraw.
As is outlined in this page, there are two problems with existing state management solutions - both of which are related to unnecessary re-computation:
- Computations of derived values are done from scratch every time a dependency updates.
- If there are no downstream values that are actively subscribed to a computed value, then the cache for that value is thrown away.
Rather than relying on a "dirty bit" approach like Excel, Signia uses a logical clock - akin to how Make uses file modification times to infer which things to "rebuild".
Let's walk through a simple example of how Signia might compute derived values. Say I want to keep track of how much money I spend on GPUs. I have two "atoms": costPerGpu and gpuCount:
I decide to buy 2 more GPUs because I don't want to be GPU-poor:
What happens under the hood when I call gpuExpense.value? Signia uses lazy updating of computed values, so gpuExpense isn't updated at the moment when gpuBought.set(12) is called. Instead, it's updated when we access its value via gpuExpense.value.
The computation itself is very simple: Signia just calls the callback that we provided in the computed function.
However, being a reactive state management library, Signia also needs to manage dependencies. From a high-level, what happens is:
- The getter for the value of gpuExpense is called.
- The update callback is called.
- The getter for the value of gpuBought is called. gpuBought is added as a dependency for gpuExpense.
- The same happens for costPerGpu, and it's added as a dependency for gpuExpense.
To manage dependencies, Signia uses a stack to manage the context surrounding derived values. Each stack frame focuses on one and only one "node" in the dependency tree; this node is designated as the child of the stack frame.
As you travel up the tree, parents are added to this node (it's stored as stack.child). The stack.offset keeps track of which dependencies are most relevant; if some dependencies aren't referenced during the most recent computation, then they're dereferenced (i.e. they're removed from the parents attribute).
Simple, right? Build the dependency tree when the computation demands it. But Signia becomes more interesting in (1) how it decides whether to recompute derived values, and (2) how it deallocates parent references.
When atoms are updated, they aren't marked with dirty flags. Instead, the global clock is incremented, and the updated atoms are marked with that timestamp. When a derived atom is computed, it checks its internal timestamp against its parents' timestamps. Only when its internal timestamp is older than any one of its parents' timestamps will a recomputation be triggered.
Let's first look at an example of how unnecessary computations are avoided. Say I want to keep track of my total expenses, which includes the rent I pay for a physical datacenter. I also decide to buy 8 more GPUs:
The direct parents of totalExpense are dataRent and gpuExpense.
Say my datacenter landlord generously lowers rent to $1000:
Here, the atoms gpuBought and costPerGpu didn't change. So gpuExpense didn't change either. This means that the logical timestamps for gpuBought, costPerGpu, and gpuBought must be less than the current global timestamp.
Signia only recomputes values if the lastChangedTimestamps of the relevant parents are newer than the current global timestamp. So gpuExpense wasn't recomputed!
Now, let's see an example of dereferencing parents that aren't relevant. I'm pretty random, so let's say that I buy GPUs randomly. I change totalExpense to:
If it's one of those times that I'm frugal, then Signia will access only dataRent, and it'll be the only dependency in the list of parents. If it's not one of those times, then both gpuExpense and dataRent will be in the list of parents.
Signia eliminates unnecessary dependencies via an offset pointer. The number of parents that a child accesses during a computation is aggregated in the offset pointer. As parents are accessed, this offset pointer overwrites the dependency list to reflect (1) the parents that are referenced during the current computation cycle and (2) the order in which they were accessed. Afterwards, any remaining parents in the dependency list are removed.
That was just a brief walkthrough Signia. I plan to explore Signia a little bit more - but that's it for now, folks.
Thanks to Steve Ruiz for answering my questions!